Beast

Beast
Showing posts with label kingtec. Show all posts

Monday, December 8, 2014

Life's a Beach, Padre.

A few additions to the Beast..
Most importantly of all: I finally have an inverter installed. This baby came straight from the hard working folks in China, unfortunately all American versions were well outta my price range. For the low price of $299.00 and free shipping, we now have power in the RV for all of our 120 V appliances and powered by our battery bank that powers the a/c.
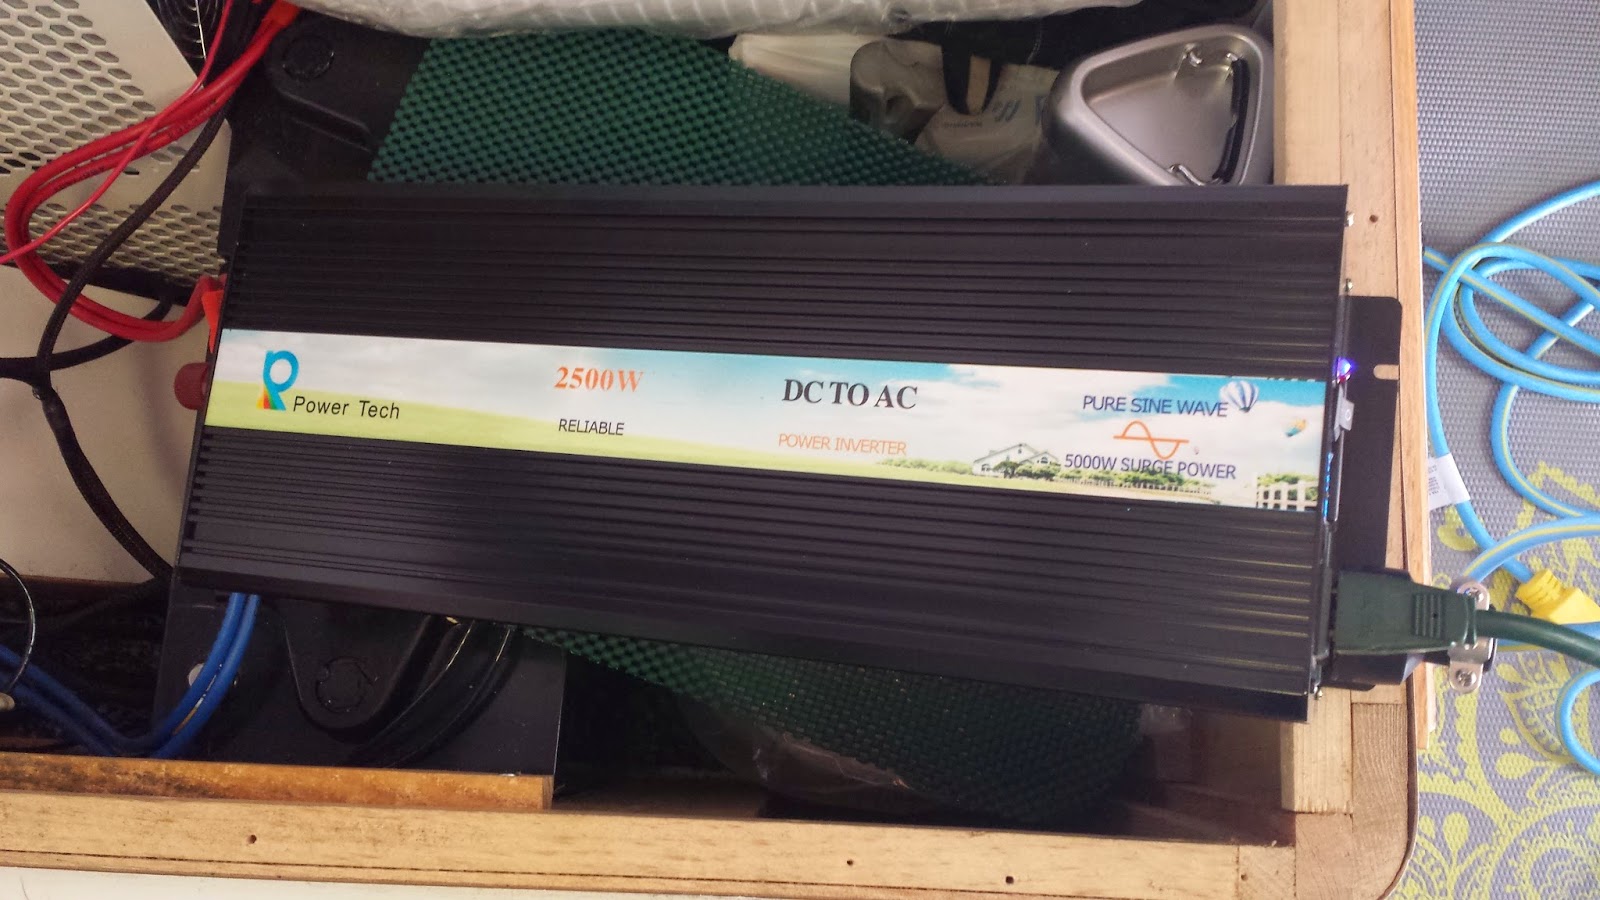
2500 Pure Sine wave inverter, just roughed in and testing.

To connect this inverter directly into my power, I had to fashion what is called a murder cable, basically an extension cord with 2 Male plugs on it, so you just plug it directly into a power outlet. This in turn powers all of the outlets and appliances on the same pole in the circuit box. We are setup with 2 poles, so I created 2 cords that plug into 2 different outlets, and hence power my entire RV.  I tested it and it handles the load of the Washer/Dryer, Microwave, the wife's hairdryer(which takes more power than anything else), and the all important Keurig.

Murder Cables fashioned by me

Also, the way my RV is wired, the 12 V charger plugs into one of the 120 volt outlets, so when I have my inverter powered on I am also providing power for all of the 12V circuits in the rig as well (this is all of the lights, pumps, stairs, and a few other things I'm surely forgetting.)

So, the inverter was really the last piece we needed in order to Boondock and be off the grid completely. I no longer need a power cord when visiting my cousins house to prevent my 12 V batteries from draining. The Solar now keeps everything charged either directly to my 48 V bank of batteries or indirectly thru the inverter, to the charger to my 12v systems.

Okay..If you are still awake after the boring electric stuff, onward to our first Boondock trip: Padre National Seashore!

It's about a 450 mile drive directly from Plano Texas to Padre, but we broke it up into 2 days and stopped at my favorite halfway point, Snook Texas. From there we finished off the remaining 250 miles the next day to Padre. At the entrance gate I went ahead and purchased my Annual National Parks Pass for 80 dollars, which will let me into all the National Parks in the country for a year for "Free". After that I pulled into the visitor center to see what the 'grocery' section had as far as necessities, picked up a couple 6 packs of Coors Light and drove to South Beach. We drove down about 5 miles, passing just a few campers and continued maybe a quarter of a mile past the sign that warns only 4x4 vehicles recommended.
This is our site, no one within miles of us either way.


View to the left

View to the right


Our camp and fence setup

View from the front door

From the dunes(Only point to get a bar or 2 of EDGE network)

Sunrise the 2nd Day

The Neighborhood watch

The 2nd night a cold front blew in FAST, and we relocated off of our beach as the Tide was coming up fast.
After a little scouting the next day I found the RV/Campgrounds. It was still primitive, just gravel parking lots with a bench, but it had grass and some protection from the winds that came constantly off the coast. Plus we enjoyed meeting many of the full timers that were enjoying the Beach. The beach was maybe 100 Yards directly in front of us, easy to access via the handicap access pier/boardwalk thing. For 8 bucks a night, it was worth the piece of mind of not waking up buried under sand. Plus some grass for the dogs to utilize(though it had a million burrs).

Our new site


The experienced folks did start getting me pretty scared by the 4th day, as we had not prepped the Beast for the hardships a beach can do to a rig. Specifically they recommended an uncoat sprayed on before coming to help stop some of the rust. Having never lived in the north where they salt the roads, this was new to me and had me a bit worried. My new grill after 1 day the screws were already rusted, who knows what was going on under my rig.


Enough for now, on that note I'll give you guys the birds. Please keep in mind with the sun out in full force I could no see any of these pictures on my phone as I took them, I just pointed and shot blindly.


Monday, October 20, 2014

Snook, Solitude, and Solar

So this last week I took the Beast down to Snook, Texas to do the Solar work at my Uncle's farm. Since he was away on vacation, it was pretty much The Beast, some donkeys, a dog named Fritz, and myself.

First things first, I needed water. I didn't feel like driving the 200 miles with the extra 800 lbs of aqua in my tank.

Filling the 100 gallon tank up water

The front yard.
Since this was taking forever, I took some pictures of where I would be doing my working and sleeping the next few days.

Pretty sure I'm the first one to ever sleep in the workshop
Nestled in among the tractors and tools
Had to unfurl this mighty satellite one more time before removing it to make room.  As well as the HD antenna behind it and the fan vent to the back right.


Over the next few days, my cousin Jason and I got to work on the solar install. We managed to get most of the panels installed before the weekend hit and he had to run off to some fairs and such showing some old tractors. But we did finish the seven hardest to place ones, leaving just a few for me to finish.

First 4 panels on front glued and screwed on

Framework for 2 of the panels in the back right
I took to the road back to Plano Texas early Saturday morning and subjected the build to a 80 mph wind test on I-45. Happy to report that none of the panels blew off! I stopped and checked at a couple rest areas along the way to make sure nothing was amiss as well.

This Sunday I completed the Solar install, building a platform for one panel in which the cords all connect and go down into the electronics cabinet below. I also hooked up five of the panels to test out the supply to the batteries. They were putting in about 5 amps at 95+ volts.  Once I connect the second set, it should be up to about 10 amps. I may have to juggle this around a bit to optimize my amps to the batteries.
The OCD among you might want to just ignore the panel in the lower left...there was just no other way.


Late today some MC4 connectors I had ordered arrived which allowed me to create the cables I needed to connect the 2nd set of five panels. Unfortunately the sun had gone down so I had no way of testing if they were working as I planned or not. I have to wait until tomorrow. Once the test is complete I'll do the wire management and secure some of the hanging wires.

In other news, the interior of the RV got a bit of an upgrade. The uncomfortable leather got replaced, though we did save the old covers. Here's the transformation:


Sunday, October 12, 2014

Fancy Electronic Do-Dads

My heartfelt apologies to those of you who don't enjoy all the technical mumbo-jumbo, but I need to get this stuff documented for my own good.

Yesterday I took about 3 hours to wire in some additional features to my new power station of 8 batteries. One is a disconnect switch which can be turned off/on to allow current to and from the batteries.  Handy if I'm storing it for a while or if I just need to disconnect power going to the batteries.  This will be helpful when I have the solar wired in as it will allow me to disconnect the power from the batteries and confirm that the new Kingtec air conditioner is running purely on Solar Power.

The other thing I wired into the mix was something much, much, more useful. That thing is the amazing Trimetric battery system monitor by Bogart Engineering. This is such a useful item, as it's wired into the system via a Shunt(pictured below), which will allow you to monitor how many amps the system is draining, how many amps are going to the battery when charging, and how many amps you have left (i.e. how much juice you have left in the batteries.) A few years ago I had actually bought one and was planning on putting into my last RV, The Chinook. I just never quite got around to doing the upgrades I wanted to that rig before switching to the Beast. Anyhow, so I have an older unit, though still new: mine is the Trimetric TM-2025RV. I actually got lucky that I had bought the higher end model years ago, as this particular model allows you to monitor up to a 48 volt battery systems instead of the standard 12 volt which is prevalent in most RVs.

I just have the Disconnect switch and Trimetric roughed in for now, they simply need to be screwed in place somewhere. The Disconnect Switch I have a home for right next to the Shunt picture below you will see the hole next to it. The Trimetric I believe I'll be placing inside the rack with all of the electronic equipment(dvd player, stereo, etc.)

Here's some exciting photos of the above items!

Disconnect Switch roughed in.

Blurry Picture of where the switch will be.  This is under the bench in the dinette, because of the overhanging wood it would be impossible to accidentally switch it on or off. Also it has to be depressed and turned at the same time.

The 500 Amp shunt mounted and sending valuable information to the Trimetric.


The Trimetric in action!

This is the Trimetric showing 51.8 Volts. When the batteries were brand new, they were sitting at 52 Volts. So I've lost .2 Volts over the last month while they sat waiting for me to work on them and also they got drained a little when I ran the A/C for a good 10 minutes on just the batteries. I have yet to recharge them, that's where the Solar comes into play very soon!  Also on the to-do list is some serious wire management.

Wednesday, October 8, 2014

Prepping the Bug-Out Vehicle

Nothing like a death from Ebola and another potential patient being reported in the general area to give you a kick in the butt to get the Revcon ready to live off the grid and to get out of the Dallas area.

Over the last 2 months I've been doing some pretty substantial upgrades to some of the systems.  Primarily upgrading to an Air conditioner that can run on Solar power, Batteries, and/or 110 v of AC power.
The only one I could find after extensive searching was made by Kingtec.  After exchanging emails with the company, it seemed the best solution to my dilemmas. The dilemmas you ask?  Well: a) staying cool anywhere in the RV without the generator burning diesel or requiring an electrical hookup, and b) to keep the dogs alive and cool when we leave them in the Beast for extended periods of time.
So within a week after ordering, my Kingtec Solar K25DZ arrived.

After getting the local RV place to install it, we discovered it wasn't cooling and was showing an error on the thermostat.  A week later a replacement unit arrived, which worked like a charm.  So maybe the first got damaged in shipping or something, who knows.  But Kingtec quickly resolved the issue by sending a replacement.

Though I did take the precaution of hooking this one up and testing it before installing it just to be sure.


Next on the list of must haves was to have a battery bank large enough to run the a/c all night long if necessary.  So after hunting around a bit I found these batteries that seemed to be up to the task:
VMAX 6V AGM Battery, 225ah.  Which was conveniently sold in an 8 pack on Amazon.  Exactly what I needed.
Another few days later after ordering them, I had 8 batteries that I needed to find a home for in the Beast. After a bit of thought, I cleaned out the 2 cabinets that are under the seats of the dinette and discovered that the batteries fit almost perfectly in them. Plus all the weight of them on that side of the Beast would probably balance out the 100 gallon tank of water that's always on the other.  Maybe I won't be as lopsided going down the highway as in the past.


2 on the right, I thought I had more space here
until I realized that the gas tank fill-up goes
through this area


6 on the left, even a little space left
over for some pantry supplies

The final placement before I started creating wires and putting it all together


After I did the wiring, I had that moment of doubt wondering if the batteries would power the Air Conditioner.  I was feeling like Clark Griswold in that moment when he was trying to get his Christmas lights to come on after checking all 10,000 bulbs.  But it powered on just fine.  The thermostat itself pulls about 0.1 amp.  With just the fan running it pulls about 2 amps, and when the compressor kicks in, it takes about 16 amps.  With 225 amp hours of battery power, could theoretically get 15 hours or so continuous cooling without any other sources of electricity.

Step 3, the Solar.  I'm told the a/c will run off 1000 watts of power.  After a bit of research I ordered from Renogy.    They are 100 watt each, flexible and only weigh about 3 lbs each. The issue now is finding space for all 10 on top of the roof.  I am pretty sure I will have to yank the huge satellite for room.  I'm going to consult with my cousins and uncle and see if we can use some backwood's engineering and create some space for them.  I have a few ideas on the matter, but I lack the welding or metalworking skills to accomplish them.  One of the casualties of the install so far is the carpeting on the ceiling.  It was stained and in already drooping in many places(Thank you Texas heat):  So I made the decision to just start ripping it down and to later replace it. With the added wiring of the A/C and solar panels, the destruction was necessary in order to access the nooks and crannies where the wires can be run.


The current solar that keeps my 12v battery
charged, I believe it's around 80 watts

This is the area above the King size bed that I hope I can fit 4-6 of the panels

A partial picture of the satellite dish that I will
most likely have to take down, room
for 2-4 panels


Manufacturer's picture of the panel